
This summer I found a new self-tanning product I love and have been sharing it on all my social media. I had 3 different friends try it and tell me they cannot figure out what they are doing wrong when it comes to applying the tanner. So, to help them out, and possibly some of you, I decided to write down the tricks I use to keep myself tan all year long.
A Complete Guide To Self-Tanning
I have 2 different types of self-tanning products I use, mousse and lotion. These tips will really carry over for either application but I will break down some key differences on how to apply and tricks to make it successful and streak free. For more on when I use each kind, check out my blog here.
Step 1: Have the necessary tools
I always tan right before going to bed so when I shower that morning, I make sure to exfoliate really good with these exfoliating gloves. They remove any lingering tan as well as any other product I might have on my skin. Make sure to pay special attention to your wrists, knees, elbows and ankles.


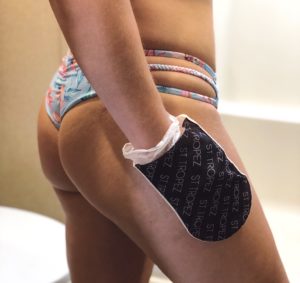
I almost always use plastic gloves when applying my self-tanners. With the mousse, you want to also have the application mitt. I use it over top of the gloves and move from hand to hand as I tan the different sides of my body. I use St Tropez brand mitt but Ulta also makes one, they all cost about the same price and I usually buy two at a time. It will last 5-6 applications before the side gets a hole in it.
Self-Tanning Hack #1 – Fill the sink or a bowl with water before you start to tan with the mousse. Once you have finished tanning, throw the mitt in the bowl to soak overnight and wring out in the morning. This way you don’t have to worry about washing and possibly messing up the tan while it’s fresh.
Step 2: Choose Your Prefered Self-Tanning Product

If I want a darker, vacation style tan I will use St Tropez mousse. It is easy to apply and leaves a really nice dark tan. I prefer the darker shade but they make two options. If you are more on the pale side or just starting out you can go lighter.
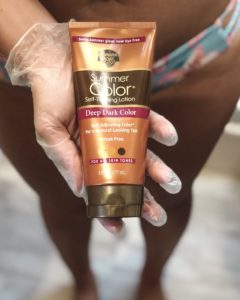
My weekly self-tanning obsession this year is Banana Boat Summer Color lotion. It is insanely easy to use and doesn’t cost a lot! Plus it gives you a nice sun-kissed tan that I think looks incredibly natural. It works the same or even better than the more expensive self-tanning lotions I have used so I have ditched those for this one.
Step 3: Application
First, I always tan my body in an order because one time I almost missed the lower part of ONE leg. Luckily I remembered in time to fix it but that would have been bad. So whatever order you go in, stick to it every time you tan. I usually do chest, left arm, right arm, stomach, lower back, upper back, left leg, right leg. It was when I went out of order that I missed a part of a leg!
Second, Apply in a circular motion as well as up and down. For the mousse I will usually do two pumps onto the mitt per area of the body. Sometimes you need more when it’s a larger body part. For lotion, I use a quarter size amount on the larger areas and a dime size on each forearm and lower leg. I have never found there to be an issue of over applying. If I think it needs a bit more I add more and it comes out even.
Self-Tanning Hack #2 – Don’t forget your feet and in between your toes! Use leftover tanner from your shin/calf area to apply to feet. You do not need to add more to just the feet or you might end up with super dark feet. I use whatever is left on my hands or mitt to rub all over my feet, around the ankles and between the toes.
Third, Apply to your face. With the lotion, this is super simple, just apply to your face. With the mousse, I wait to do my face until very last. I don’t add more tanner to the mitt, I just press whatever is left on the mitt to my face and do mini circles with it. It comes out great every time.
Step 4: Clean Up
Once I have finished all the areas, I mentally run through them all again just to make sure! Once I am sure I have tanned all areas, I begin the clean up and hand washing.
For lotion applications I simply wash my hands with soap. I will usually wash them twice just to be sure. Then I dab a tiny bit of lotion to the back of one of my hands and rub the back of the other hand together so my palms stay clean.
For mousse applications, I remove the gloves but keep the mitt out of the water. (see hack #1 above) Press whatever tanner is left on the mitt to the back of each hand. Then I toss it in the water. I carefully rinse the palms of my hands in water. If I mess up and think I got the back of my hands wet I will dab a tiny bit of mousse directly to the back of my hand and rub it in with the back of my other hand.
I used to take a damp paper towel and run it along the backs of my knees, inside elbows, and the tops of my feet. However, I haven’t found the need to do that with either of these tanning methods. If you think you may have gone too dark on these areas, a damp paper towel is a great way to remove some of the tanner.
That’s it! Sleep tight and let the color develop! I usually wear loose fitting pajamas post tan and if anything gets on them or the sheets it washes out easily. Sheet or clothing transfer is really only an issue with the mousse tanning method.
Self-Tanning Hack #3 – Coola Face Serum. I use this every other day to keep my face with a glow that I love. I still occasionally break out and I have acne scars so I really love to have a tan on my face to even it all out. It is spendy but one bottle lasts me almost a year so it’s worth it!

Check out all my self-tanning products here!